Windows 11 Keeps Freezing Easy Ways to Fix It
Windows 11, which initially suffered from a number of bugs before its release, has come a long way since then and has undergone ongoing optimization. But, Windows 11 still has numerous bugs that, if left unchecked, will eventually cause your computer to become unresponsive and sluggish.
It’s possible that Windows 11 on your computer keeps freezing for a number of different causes, including faulty storage devices, inadequate RAM, corrupted system files, or an improper screen resolution aspect ratio.
You should, however, be able to troubleshoot and fix these difficulties on your own as long as the hardware on your computer matches the minimum system requirements to run Windows 11. Windows 11 Keeps Freezing Easy Ways to Fix It
Run a Malware Scan
If you notice that Windows 11 frequently becomes unresponsive, the first thing you need to do is check to see whether or not your computer is infected with any form of malicious software. Illegal software makes your computer more prone to crashing and can even use a significant portion of your system’s resources, which can result in a decrease in performance and even frequent freezing of the computer.
So, you should consider scanning your computer for malware to check that this is not the problem.
- Right-click the start menu and select Settings.
- Navigate to Privacy & security > Windows Security.
- Select Virus & threat protection under Protection areas.
- In the new window that pops up, click on Scan options.
- Select Full scan and click on Scan now.
Windows Update
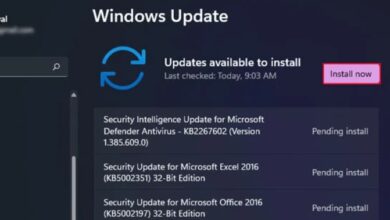
You might also try updating Windows to see if this resolves the issue of your PC being unresponsive at random intervals. If this issue was caused by bugs in your version of Windows 11, it is likely that a Windows update would correct the issue. Windows updates bring bug patches for known issues, therefore installing the most recent update should resolve the issue.
- Right-click the start menu and select Settings.
- Click on Windows Update from the left sidebar.
- Select Check for updates.
- If an update is available, Windows 11 will automatically start downloading it.
- Restart your computer to install the downloaded update.
Check Your RAM
You should also check the RAM on your computer to make sure that it isn’t the factor that’s creating the problem. Your system may unexpectedly stop or even restart if it has bad RAM, which can be frustrating. Using the Windows Memory Diagnostic tool is one option you have for determining the current condition of your RAM.
- Launch Run.
- Type
mdsched.exeand press Enter. - Select Restart now and check for problems in the new window.
- Follow the on-screen instructions and restart your computer.
- After the restart, Windows Memory Diagnostic will start checking your RAM. After it is done, it will restart again and display the results.
In the event that Windows Memory Diagnostic shows that there are problems with your RAM, you should try reseating the RAM in its slots. If you have more than one stick of Memory, you can also try reseating them in different orders to see whether the problem is isolated to just one of them. If none of these solutions work, you can try switching out the RAM in your computer.