On Windows, removing a file is an easy and uncomplicated process that can be performed by anyone. To delete a file, you must first select it, then either press the Delete key on your keyboard or right-click on the file and select the Delete option from the context menu. You can also use the shortcut key combination of Shift + Delete to coerce Windows into deleting the file without first moving it to the Recycle Bin. Remove a File Permanently with These Steps
Unfortunately, there are some circumstances in which you will not be able to delete a file at all, and attempting to do so via the standard procedures will result in error messages. In these kinds of situations, you will need to rely on command-line interfaces in order to forcibly delete anything or get to the bottom of the issue that is generating these kinds of problems.
Command Line Interface
Forcibly deleting a file in Windows can also be accomplished through the use of command-line interface tools such as the Command Prompt and PowerShell.
Nevertheless, the commands cannot delete read-only or hidden files on their own; thus, you will need to employ the force options (/f or -force) in conjunction with them in these kinds of situations.
At this prompt for commands
- To open Run, hit the Windows key in combination with the R key.
- To open the Elevated Command Prompt, start by typing cmd and then pressing Ctrl + Shift + Enter.
- To permanently remove the file, type the command “del /f /q Full path of file” and then press the Enter key on your keyboard.
- For example, if you want to remove File1.txt which is located in D:Folder, you need to enter del /f /q
- “D: FolderFile1.txt” on the command prompt.
Replacing the File
Another method for erasing a file permanently is to replace it with a new copy of the same file. You will be able to delete some files using this procedure that you were unable to delete using the methods described above. It is also important to keep in mind that the file will not be placed in the Recycling bin.
Make a copy of the file you want to remove in a different directory, but give it the same name as the original file.
It is recommended that you copy or move the new file into the folder that already contains the old file.
When it asks you if you want to replace the file, just accept the prompts that it gives you.
If a file is being used by an application at the moment or is being held by an application, an error message will appear if you try to delete the file. The error message will state that “the action can’t be completed because the file is open in another program.”
You could make an effort to locate the program that is making use of the files, then exit the program or terminate it using the Task Manager before deleting the file. If you are unsure which application it is, you should restart your computer and then delete the file.
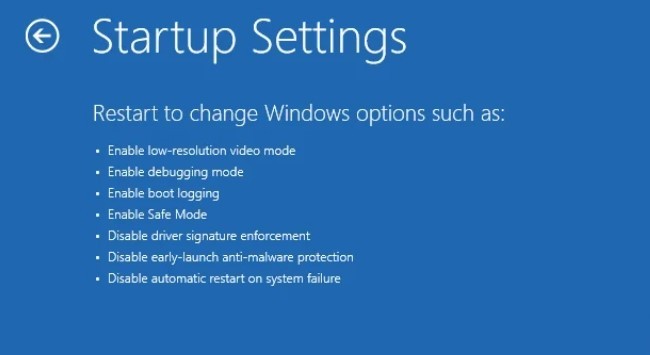
Nevertheless, if the application in question is a startup process, simply restarting the computer might not be enough to get the process to loosen its grip on the file. In this particular circumstance, you won’t be able to delete the file until you boot into safe mode first.
- Open the Start menu and click on the power button. Press and hold the Shift key and then click Restart. It will load the Advanced Startup options.
- Here, select Troubleshoot > Advanced options > Startup Settings > Restart.
- After the reboot, you’ll see the startup settings again. Press F4 or 4.
- Now you can use any method to delete the file after logging in to a user account.
Modifying Permissions
You are unable to delete a file unless the user account you are logged in with or the user group you belong to has full ACL permissions for the file. In that case, an error message along the lines of “You need authorization to execute this activity” will be displayed.
In order for you to remove the file, the security settings on your computer need to be adjusted.
- Log in to an Administrator account.
- Right-click on the file and select Properties.
- Go to the Security tab.
- Click on Advanced and select Change next to Owner.
- Type
Administratorsor the user account name and hit Check Names. The name should now show “Computer Name”\“user name” or “Computer Name”\Administrators. - Click OK > OK.
- Click Edit and select the user account.
- If the account is not there,
- Select Add.
- Type
Administratorsor the user account name and hit Check Names. Then, click OK. - Check Full control and click OK > OK.
- Now delete the file the normal way or through the Shift + Del hotkey.


